Sunday, 1 August 2021

Heath Hand Warmers - Free Crochet Pattern


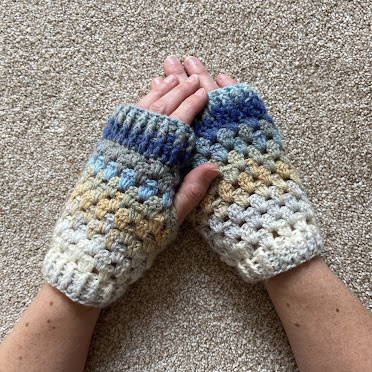
I designed the crocheted Heath Hand Warmers to feature in a YouTube tutorial aimed at beginner crocheters. You can watch the video here HERE and I have inserted links throughout this pattern to help you on your way if you are relatively new to crochet. If you are a seasoned crocheter though, you can whip up a pair of these mitts in an afternoon!

The pattern is named for our local heathland where we spend many happy hours walking as a family.  I hope you enjoy making these, happy hand warmer making!

You can buy a lovely ad-free PDF version of this pattern here!


Pattern is written in US terminology

Yarn:

Any DK yarn. The samples I made used around 59g per pair (using DK yarn with 225m per 100g).

The speckled sample you see above is Craft House Magic yarn in the colour "Land of Make Believe".

Tools:

- 3mm hook, or size needed to obtain gauge.

Crochet stitch markers (lobster clasp or bulb pins).

- Darning needle for weaving in ends.

- Scissors

Gauge:

18sts and 10 rows = 4”/10cm in granny stitch

(These are not designed as fitted mitts so a small variation in gauge shouldn’t cause too many problems, but remember if you don’t have gauge you could end up with mitts smaller or bigger than intended, and the amount of yarn you need to complete your mitts will change.)


Sizes:

This pattern is in a size that will fit most hands with ease.
In the paid-for PDF (available here) I have included an option for a slightly smaller size if you prefer your mitts snug, or you have teeny hands, or you’re making the Heath Hand Warmers for a smallish person :)
 
The finished measurements are roughly:


Pattern


Bottom Cuff

Chain 36 (leave a longish tail at beginning for sewing in later)


Rnd 1 (link):      

You have two options – the usual way, which is to hdc in 4th chain from hook and in every chain across (34hdcs incl. turning chain).

OR! You can use my Upside Down method: Locate the 4th chain from the hook and flip to show back bump on underside of chain – work an hdc in this bump and in every bump across. (34hdcs incl. turning chain)

Video Link! I show you how to sew the little gap created after you join to work in the round in rnd 2.


Rnd 2 (link):         

Sl st to top of turning ch3 to join to work in the round (careful not to twist!). Ch2 (doesn’t count as stitch), fphdc around stitch directly below (the turning chain) Bphdc around next hdc. Continue around alternating fphdc and bphdc, finishing on a bphdc. Join with sl st in top of first fphdc. (34sts - 17 fphdcs and 17 bphdcs)

Tip! Place markers in the first fphdc and last bpdc of the cuff rounds to help you find your way if you are new to this stitch.

Rnd 3 (link): 
Ch2 (doesn’t count as stitch), fphdc around next fphdc, bphdc around next bphdc. Continue around alternating fphdc and bphdc, finishing on a bphdc. Join with sl st in top of first fphdc. (34sts - 17 fphdcs and 17 bphdcs)

Rnd 4 
(link)
Repeat Round 3. (34sts - 17 fphdcs and 17 bphdcs)

Main Mitt Bottom


Tip! We will now be turning at the end of each round – pay attention to what side the round is on (WS or RS) to stay on track! 

Rnd 5 (RS) 
(link): 
Ch3 (counts as dc), 2dc in same stitch. *Sk2, 3dc in next stitch. Repeat from * until 3 st remain, sk1, 3dc in next st (which will be a fphdc), sk1, sl st in top of starting ch3, turn. (36 dcs/12 x 3dc clusters)

Rnd 6 (WS) 
(link)
Ch3 (counts as dc), 2dc in gap between clusters below, *sk 3dc, 3dc in the gap between clusters. Repeat from * until 1 3dc cluster remains and you’ve worked into all the gaps. Sk remaining 3dc cluster and join with sl st to starting ch3, turn.


Rnd 7 (RS) (link)    Repeat rnd 6.


Rnd 8 (WS) (link):    Repeat rnd 6.


Rnd 9 (RS) (link)    Repeat rnd 6.


Create Thumb Hole


Rnd 10 (WS) (link):  

Ch3 (counts as dc), 2dc in gap between clusters below, *sk 3dc cluster, 3dc in next gap. Repeat from * until 3dc remain. Do not join. Turn.


(You’re just over halfway done!)


Rnd 11 (RS) (link):   

Ch3 (counts as dc), sk the first 3dc cluster, 3dc in the next gap between clusters and in each gap around until one 3dc cluster remains, sk2, dc in last st, turn. (35dcs)

Rnd 12 (WS) 
(link):
Ch3 (counts as dc), 1dc in same stitch, *sk 3dc cluster, 3dc in gap. Repeat from * until 4dcs remain (the 3dc cluster and the turning ch), sk 3dc, 2dc in gap between 3dc cluster and last st, turn. (34dcs)


Rnd 13 (RS) (link):
At the end of this round we join to close the thumb hole.

Ch3 (counts as dc), sk first 2dc cluster, 3dc in gap *sk3, 3dc in next gap. Repeat from * until 1 2dc cluster remains, sk 1, 1dc in last st, sl st in top of ch3 to join. Turn. (35dcs)


Main Mitt Top


Rnd 14 (WS) (link):
Ch3 (counts as dc), 2dc in the gap below (the thumb hole). Sk4, 3dc in next gap, *sk3, 3dc in next gap, repeat from * until 4dcs remain (1 x 3dc cluster and 1 x ch3), sl to top of starting ch3 to join, turn. (33sts/11 x 3dc clusters)

Rnd 15 (RS) 
(link):
Ch3 (counts as dc), 2dc in gap below. *Sk3, 3dc in next gap. Repeat from * until 3st remain, sk last 3st, sl to top of starting ch3 to join. DO NOT turn.

From now on we will only be working on the right side, no more turning!


Top Cuff


Rnd 16 (RS) (link):
Ch3 (counts as dc), 1dc in same st as ch3, dc in every st around, sl st in starting ch3 to join. (34dcs)

Tip! Place markers in the first fpdc and last bpdc of the cuff rounds to help you find your way if you are new to this stitch.

Rnd 17 (RS) (link)
Ch2 (doesn’t count as stitch), fpdc around stitch below (the starting ch3 from rnd 16), bpdc around next stitch * fpdc around next st, bpdc around next stitch, repeat from * until end of round (ending on a bpdc). Sl st to top of starting fpdc to join (34sts - 17 fpdcs and 17 bpdcs)

Rnd 18 (RS) 
(link):
Ch2 (doesn’t count as stitch), *fpdc around fpdc below, bpdc around next bpdc, repeat from * until end of round (ending on a bpdc). Sl st to top of starting fpdc to join.

Rnd 19 (RS) 
(link)
Repeat round 18. Fasten off invisibly

Video Link! I show you how to fasten off invisibly at the end of the mitt.


Thumb Border - Both Sizes


With mitten right way up join yarn with sl st to centre st of the 3dc cluster at the bottom of thumb.

Video Link! I show you where to join your yarn and how to work the thumb border.

Rnd 1:

Ch1 (does not count as stitch), sc in same st (place marker in this sc), sc in next dc, 2sc around the body of every dc up the side of the thumb, sk the bottom of the 3dc cluster at the top of the thumb, turn the mitt around and work 2sc around the body of every dc down the other side of the thumb, sc in the remaining dc of the ch3 cluster at the bottom of the thumb. (19scs)

Rnd 2
Without joining, work 1sc in the marked stitch from beginning of rnd 1 (move marker to sc just made), then 1 sc in every sc around. Fasten off invisibly. (19scs)


Mitt Modifications!


Make your mitts as individual as you are! Here are some ideas and tips to Modify your Mitts!

* Play with colour! Use a contrasting colour for the cuffs and thumb, or stripe the main mitt pattern in two, three, four…as many colours as you like!
 
* Go long! Add rounds after the bottom cuff to make your mitts longer on your arms, just make sure you always add an even number of rows to maintain the RS/WS pattern – the first round of the thumb hole (round 10) should always be on the WRONG side!


* Add trim! If you used my “upside down start” then it is easy to join your yarn into any of the bottom cuff stitches and add a simple (or elaborate!) trim…

* Adjust! Want a longer or shorter cuff at the bottom or top? Just add or subtract rounds!


Happy Mitt Making!


Thursday, 29 March 2018

Tutorial: Crochet Multiplication Squares

Hello lovely yarny friends and welcome to the tutorial for my Multiplication Squares


This is a simple little granny square pattern I made up a few years ago and I thought it would be fun to share a tutorial for how to make them.  I have written this tutorial in quite a detailed way and I have also created a PDF to show in teensy tiny detail how to do the first round using the magic ring technique.  So this pattern should be suitable for every crochet ability!  But of course if you have any questions at all just comment below or pop along to my Ravelry Group to ask for help.

Tools and Info:

  • Terminology - I use US terminology in this tutorial.
  • DK yarn - I used scraps of DK acrylic yarn as I started this as a way to use up all my old acrylic stash.  But you can use any yarn you like, this is a great way to use up even the teensiest of scraps.
  • 4mm crochet hook (or appropriate hook size for your yarn)
  • Gauge - not important

Abbreviations:
  • Ch - Chain
  • DC - Double crochet (US terms)
  • SC - Single crochet (US terms)
  • St St - Slip Stitch

Step 1 - starting with the Magic Ring
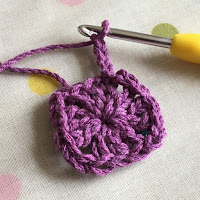
First make a magic ring and ch3 (counts as dc), then make 2dc into the ring and ch2.  (If you would like to see detailed instructions on how to complete the first round of this Granny Square using a magic ring please take a look at my PDF instructions.)

     
                                      Magic Ring                                        ch3, 2dc, ch2

Step 2 - Complete the first round
3dc into the ring, ch2, 3 times.  You now have four sets of 3dc and four ch2s.  Join to the top of the first ch3 with a sl st.  Now pull the magic ring tight to close it.

                                   Join with a Sl St                         Pull the Magic Ring closed

Step 3 - Complete the second round
Ch3 (counts as dc), then make 2dcs into the ch2 space just behind - it'll feel like you are going backwards but by the time this second round is finished it'll look great!  

                                                Ch3                                   Work 2 dcs into ch2 space

Now ch1, then *3dc, ch2, 3dc, ch1 into the next ch2 space.  Repeat from * another 2 times.  In the next ch2 space (where I am pointing my pencil in the first photo below) you already have the ch3,2dc you started with.  In that same space make 3dc, ch2 then join to the top of the starting chain with a sl st (where I am pointing with my pencil in the second photo below)

  
                          3dc, ch2 in the last ch2 space        Join with sl st to top of starting chain

Hurrah! Fasten off and weave in those ends because you've just completed the first two rounds!


Step 4 - Join the white yarn
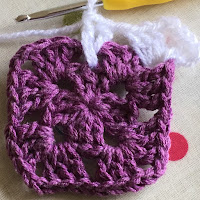
Time to add the white border!  The white border is made up of three very simple rounds.  First join the white yarn into any of the corner ch2 spaces.  I make a slip knot on my hook, insert the hook into the ch2 space, pull the yarn through the ch2 space and through the slip knot, making a sl st.


                         Make a slip knot on the hook               Pull the yarn through the ch2 space...
       
                                                          ...and through the slip knot.


Step 5 - Start the third round
Ch3 (counts as dc), 2dc, ch2, 3dc all in the same ch2 space.

 
                                                  Ch3...                         ...then 2dc, ch2, 2dc in same space 

Step 6 - Make the spiked stitch
Ch1, then make 1dc in the next ch1 space. Now we are going to make the spike stitch that gives the square the "multiplication" shape.  You are going to make the next dc into the middle dc of the round below.  In the first picture below I am pointing to where you will make the spike with my pencil.

               
          1dc in the middle dc on the round below                        Completed spike stitch

After making the dc into the round below, you will make the third dc in the ch1 space of the current round. You now have three dcs: the first in the ch1 space of the current round, the second in the middle dc of the round below, and the third in the ch1 space of the current round, like so:


Step 7 - Complete the third round
Ch1, *3dc, ch2, 3dc in the next corner ch2 space, ch1 and then make 1dc, 1 spike stitch, 1 dc into next ch1 space, ch1.  Repeat from * two more times then join with a sl st to the top of the starting ch3.

Step 8 - The fourth round
For the fourth round we are going to make a sc into every dc and every ch1 space, and 3sc into every corner ch2 space.  To start - ch1 then make a sc into the same stitch that you made your joining sl st into.  Then make 1sc into each of the next 2dcs, then 3dcs into the corner ch2 space.


Continue around making 1sc into each dc and ch1 space around - remembering to make 3sc into each corner ch2 space.  Finish the round by making a sl st in the first sc you made.

Step 9 - The fifth and final round
Ch1 then make 1sc into the same stitch where you made your joining sl st.  Now make 1sc into every sc around, make 3sc into each corner sc.


You're finished! You have completed your first Multiplication Square!


Now you can go forth and make more!  I have been using scraps in all the colours of the rainbow to make my first two rounds. You could do them using just one or two colours, or using leftover hand-dyed - whatever you feel like! 


In the next few weeks I hope to create the tutorial for making these squares into a blanket and I will link to that tutorial from this post once it's ready.

If you have any questions at all please leave me a comment and I will do my best to help.

Happy crocheting!

Ali xx


Monday, 12 March 2018

Podcast Epiosde 27 - Notes and Links

Welcome to Little Drops of Wonderful!  My podcast is about crochet, knitting, and other lovely crafty stuff.

Episode 27 was a little..um...snotty (in the cold sense, not the condescending sense...) and also a little unplanned. Despite this I still managed to ramble on for almost an hour. Here are all the details of the things I talked about with links etc. If there's anything I haven't covered here please do ask in the Comments!

: : TIME STAMPS : :
- Finished Objects -
02:53
- Works in Progress -
18:55
- Incoming -
31:31
- Sharing the Love -
45:21
- And Finally... -
47:52


: : Finished Objects : :


- Hufflepuff Socks were made toe up using the Sockmatician’s toe-up recipe as a guide.  The heel is a Fish Lips Kiss heel done in garter stitch (as I am SO original, haha!)  The gorgeous yarn is a Norah George self-striping and it was a gift from the equally gorgeous Emma of Eldenwood Craft.

- Mary Margaret’s Lace Tam - the pattern is free on Ravelry and is by Mary Craver who created it based on the hat worn by the character Mary Margaret in the Netflix series ‘Once Upon a Time’. I LOVED this pattern.  The yarn is “Serenity Farms Yarn” by Cary, who is @mywoolmitten on Instagram, it was pure joy to knit with. All my notes for my own version of this are on my Ravelry Project page.

- C2C Moss Stitch pattern by Polly Plum – a free pattern on the Every Trick on the Hook blog.  I am using this pattern as a scrappy blanket.  (The pink mini I mentioned is actually “Peppermint Candy” by Kate Selene.)  The amazing bag I am keeping this project in was made for me by lovely Hanna of the Hanna from Sheep’s Alley podcast.


: : Works in Progress : :

- Trophy Fox Head – the book is called “Animal Heads – Trophy Heads to Crochet” and it is by Vanessa Mooncie.  Despite my lazy grumblings about page turning it is a fantastic book stuffed with patterns.  One day I will finish this fox…

- Test knit socks – the neon pink yarn is a sock set by Hand Dyed by Kate


: : Incoming : :

- The Flower Power set is by Barbara of knittingilove – she has a podcast and an online shop where she sells needle holders, tags, keyrings, coasters and lots of other knitty things!

- The Little French Meadow mini skein club is a three-month club and you can buy it on their Etsy shop.

- The yarn that was a gift from my sister is “Cheer Up Buttercup” by Little French Meadow.  My sister is @xstitchcrochet on Instagram if you wish to go and stalk her a bit.


: : Sharing the Love : :

Sam has the Betsymakes podcast and Etsy shop and she is @betsymakes on Instagram


: : And Finally… : :

I talked about being a Guilty Knitter (and neglectful crocheter).


Other Things Mentioned:
- Emma of the Eldenwood Craft podcast (and Etsy shop!)
-  The pink shawl I was wearing is the Moonlit Shawl by Sandra Paul (Cherry Heart) made with yarn by Sam of BetsyMakes (link above)
-  The crochet stitch book I mentioned is The Ultimate Crochet Stitch Bible by Collins and Brown.
-  I also mentioned Claudia of the Crochet Luna podcast and her Fortune Cookie CAL.


I *think* that’s everything – if you have any questions just ask!  See you again in a couple of weeks and thank you so much for watching.


Ali xx

Podcast Episode 26 - Notes and Links

Welcome to Little Drops of Wonderful!  My podcast is about crochet, knitting, and other lovely crafty stuff.

Episode 26 was a long 'un!  Details of everything I talked about below - if you have any questions leave a comment! :)

: : TIME STAMPS : :

- Finished Objects - 05:47
- Works in Progress - 14:59
- Giveaway Draw - 34:13
- Incoming - 38:20
- Sharing the Love - 01:14:32


: : Finished Objects : :

- You're a Wizard Mitts pattern and yarn (in "courage" colour") by Gamer Crafting
- Gremlin based on a pattern in the book Curious Creatures for Immature Adults
- Lillia's bag - just something I made up


: : Works in Progress : :

- Granny Square blanket - using my own little made up Granny square that I can my "multiplication squares" Tutorial will be made some time soon!
- Good Intentions embroidery being made as part of the #goodintentionsSAL being run by Chrissie Crafts
- Jumper for Lillia being made using Sirdar pattern no in Sirdar Toscana DK shade
- Test Knit being made with neon pink yarn by Hand Dyed by Kate


: : Giveaway Draw : :

- The winner of the Knittingilove Flower Power set was J-Cheeseman - Well done and your prize is in the post!


: : Incoming : :

- Mitten Blockers from The Knitting Shed
- Sue Stratford's book is "Knit Me Dress Me Love Me"
- River Knits minis available from Etsy - RiverKnitsUK
- Little French Meadow Mini Skein Club is a three-month subscription and can be bought on Etsy
- Yarn from Sandra and Chrissie is Lingarn
- Little lavender pouch is by Caroline Love to Sew, she is on YouTube and sells beautiful bags on Etsy as Love to Sew UK.
- My swap parcel was with Cary of @mywoolmitten and the yarn is Serenity Farms (as yet unnamed!) and The Woolen Homestead "Hogsmeade Holiday"
- The yarn in my parcel from Lou @foxyyarn was from London House Yarns (the sock set called "Baubles") and from Norah George ("Snowdrop")


: : Sharing the Love : :

Here's everyone I mentioned:
- Nordic Stitches Podcast
- Artic Knitting Podcast
- Lorraine Pugh Designs
- Knittingilove Podcast
- Yarngasm Podcast
- CraftyCatKnittyBits on Etsy
- Max's World on Etsy
- mywoolmitten on Instagram
- The Woolen Homestead on YouTube and Etsy
- Victoria Knits Podcast
- shadowsatmidnightknits on Instagram
- himikonosekkai on Instragram
- RiverKnits UK on Etsy and Instagram
- Knit Cosmic Strings - on Instagram and Etsy
- Corner of Craft Podcast
- Dunkelgrun Podcast
- Stranded Dyeworks - YouTube and online shop
- Inside No.23 Podcast
- Knitting Expat Podcast
- Cherry Heart Podcast
- Hanna from Sheep's Alley Podcast
-Yarn to Table Podcast
- Kim Smith Happy podcast (and bricks and mortar yarn shop)
- Crochetcakes on YouTube and Instagram
- The Crochet Circle Podcast
- The Biff Sugar Podcast

Phew! Another long one! I really need to work on my rambling..! :)

See you again soon!

Ali x

Thursday, 8 February 2018

Podcast Episode 25 - Notes and Links

Well it's been a while since I last sat down to do a podcast proper, before Christmas in fact.  I had so much to talk about I had to split it into two parts - a Double Feature no less! The details of everything I spoke about are below, no doubt with lots of accidental omissions so please do contact me if you are left with any burning questions.  Oh, and don't forget to comment here or on the video to enter the giveaway to win one of Knitting I Love's fabulous Flower Power Collection sets!
Part One:
We start off with a little intro and some explanation about my longer than planned absence then we go into:
- FINISHED OBJECTS 07:43

  • Strictly Socks: Spellbound Socks by Naomi Buchanan
    • This is a paid-for pattern
    • Thank you Naomi for gifting this to me especially for my Strictly Socks!


  • Sky Rim Mittens by Becky Robbins
    • This is a free pattern! I absolutely love these.


- WIP REVIEW 37:11
  • Granny Wrap (my advent shawl) by Annaboo's House
    • A free pattern!

  • Sirdar Cotton Top - a Sirdar pattern
    • A paid-for pattern which I bought at City Knits in Bournville, I am not sure if this is available online.


Part Two:
We start off with the Strictly Sock-a-long prizes!! Then we go on to:
- 2k Subscriber Giveaway 17:10
- Incoming Goodies 20:46
- Waltham Abbey Wool Show Vlog 39:58
If you are entering the giveaway please leave a comment below :)
Ali x